Archiv der Kategorie: Tipp/hint

Wie man die Qualität von Fernradwegen mit Hilfe von OSM und Brouter berechnet

Vor vielen Jahren habe ich mich in diesem Blog schon einmal über die Absurdität von ausgeschilderten Fernradwegen ausgelassen. Was sich seither geändert hat ist die Tatsache, dass es das Openstreetmap basierte Routingprogramm, dass ich mir damals gewünscht habe inzwischen gibt. Die Rede ist von Brouter. Eine Software von Arndt Brensched, die es sowohl als App für Android als auch als Web-Planungstool gibt.

Nun lese ich heute einen Tweet von Hanno Böck, der sich ebenfalls über solche Fernradwege beschwert.

Nachdem ich wie üblich bei solchen Fragen das Brouter Tool empfehle wird mir klar, dass Brouter vermutlich genau das was Hanno gern hätte leisten kann. Was man gerne hätte wäre ja so eine Art Qualitätsfaktor für Radrouten.

Nach einer kurzen Kommunikation mit Arndt wird klar, dass das ganz einfach ist. Man konfiguriert das Routingprofil für Trekkingrad so um, dass man die Behandlung der Fernradwege umkehrt.

Aus folgender Anweisung:

else if ( is_ldcr ) then 1

macht man einfach diese hier:

else if ( not is_ldcr ) then 10000

Nun deaktiviert man noch die Höhenkosten und fertig ist der Engine zur Berechnung der Qualität von Fernradwegen.

assign consider_elevation = false

Je kleiner der durchschnittliche Kostenfaktor im Brouter-Web um so besser ausgebaut ist die Radroute. Wer die beschriebenen Änderungen nicht selbst machen möchte kann sich unter https://home.geggus.net/score.brf das geänderte Profil runterladen.

A Matrix Keypad on a Raspberry Pi done right

There are quite a few articles to be found on the Internet on how to use a matrix keyboard on a Raspberry Pi.

Surprisingly none of them seems to use the method documented here.

Instead most of them seem to use some handcrafted Raspberry Pi and python-only solution with debounce logic implemented in userland.

As with my article on Setting up a GPIO-Button “keyboard” on a Raspberry Pi this uses a device tree based approach and will not require any driver code in userland.

As with the solution above an application will be able to use this keyboard just in the same way as any other keyboard (e.g. a standard USB keyboard) connected to a computer running Linux.

So here is how to do it:

To check if the driver is available modinfo matrix-keypad should show you something like this:

pi@raspberrypi:~$ sudo modinfo matrix-keypad
alias:          platform:matrix-keypad
license:        GPL v2
description:    GPIO Driven Matrix Keypad Driver
author:         Marek Vasut <marek.vasut@gmail.com>
srcversion:     54E6656500995BD553F6CA4
alias:          of:N*T*Cgpio-matrix-keypadC*
alias:          of:N*T*Cgpio-matrix-keypad
depends:        matrix-keymap
intree:         Y
vermagic:       4.9.35+ mod_unload modversions ARMv6 p2v8 
</marek.vasut@gmail.com>

To enable the driver we need to create a device tree overlay file suitable for a given matrix keyboard.

As an example I use the following device available at your favorite china shop.

4x5matrix

Here is what the corresponding device tree overlay file 4x5matrix.dts looks like:

    /dts-v1/;
    /plugin/;
    / {
           compatible = "brcm,bcm2835", "brcm,bcm2708", "brcm,bcm2709";

           fragment@0 {
              target-path = "/";
              __overlay__ {
                 keypad: MATRIX4x5 {
                    compatible = "gpio-matrix-keypad";
                    debounce-delay-ms = <10>;
                    col-scan-delay-us = <10>;
                    /* 
		       try to use GPIO only lines
                       to keep SPI and I2C usable
                    */
                    row-gpios = <&gpio 27 0    // 1
                                 &gpio 22 0    // 2
                                 &gpio 10 0    // 3
                                 &gpio 9 0>;   // 4

                    col-gpios = <&gpio 13 0    // 5
                                 &gpio 26 0    // 6
                                 &gpio 16 0    // 7
                                 &gpio 20 0    // 8
                                 &gpio 21 0>;  // 9
                    /*
                      Keycodes from /usr/include/linux/input-event-codes.h
                      converted to hex using printf '%02x\n'
                    */

                    linux,keymap = <
                                    // col0 row0 KEY_LEFT
                                    0x00000069
                                    // col0 row1 KEY_KP0
                                    0x01000052
                                    // col0 row2 KEY_RIGHT
                                    0x0200006a
                                    // col0 row3 KEY_KPENTER
                                    0x03000060
				    // col1 row0 KEY_KP7
                                    0x00010047
                                    // col1 row1 KEY_KP8
                                    0x01010048
                                    // col1 row2 KEY_KP9
                                    0x02010049
                                    // col1 row3 KEY_ESC
                                    0x03010001
                                    // col2 row0 KEY_KP4
                                    0x0002004b
                                    // col2 row1 KEY_KP5
                                    0x0102004c
                                    // col2 row2 KEY_KP6
                                    0x0202004d
                                    // col2 row3 KEY_DOWN
                                    0x0302006c
                                    // col3 row0 KEY_KP1
                                    0x0003004f
                                    // col3 row1 KEY_KP2
                                    0x01030050
                                    // col3 row2 KEY_KP3
                                    0x02030051
                                    // col3 row3 KEY_UP
                                    0x03030067
                                    // col4 row0 KEY_F1
                                    0x0004003b
                                    // col4 row1 KEY_F2
                                    0x0104003c
                                    // col4 row2 KEY_KPSLASH there is no KP_#
                                    0x02040062
                                    // col4 row3 KEY_KPASTERISK
                                    0x03040037>;

                 };
              };
           };
      };

Further documentation can be found in the file Documentation/devicetree/bindings/input/matrix-keymap.txt inside the Linux kernel source tree. Feel free to ask if it does not work for you.

Now to enable our keyboard there are only four steps left:

  1. Connect the keyboard to the GPIO lines as defined in the dts file
  2. Compile the dts file to the binary dtbo format. This is done using the device tree compiler of your kernel tree:
    ./scripts/dtc/dtc -W no-unit_address_vs_reg -I dts -O dtb -o 4x5matrix.dtbo 4x5matrix.dts
    
  3. Copy the resulting dtbo file to /boot/overlays/4x5matrix.dtbo on the Raspberry Pi
  4. Add the following to /boot/config.txt:
    dtoverlay=4x5matrix
    

Now after rebooting the Pi the lsinput command should show us a new keyboard connected to the device. You may need to install a package called input-utils first if this command ist not available on your Pi.

Here is what this looks like after pressing the Enter Key on the matrix keyboard:

pi@raspberrypi:~$ sudo -s
root@raspberrypi:~# lsinput
/dev/input/event0
   bustype : BUS_HOST
   vendor  : 0x0
   product : 0x0
   version : 0
   name    : "MATRIX4x5"
   bits ev : EV_SYN EV_KEY EV_MSC EV_REP

root@raspberrypi:~# input-events 0
/dev/input/event0
   bustype : BUS_HOST
   vendor  : 0x0
   product : 0x0
   version : 0
   name    : "MATRIX4x5"
   bits ev : EV_SYN EV_KEY EV_MSC EV_REP

waiting for events
19:56:28.727096: EV_MSC MSC_SCAN 24
19:56:28.727096: EV_KEY KEY_KPENTER (0x60) pressed
19:56:28.727096: EV_SYN code=0 value=0
19:56:28.797104: EV_MSC MSC_SCAN 24
19:56:28.797104: EV_KEY KEY_KPENTER (0x60) released
19:56:28.797104: EV_SYN code=0 value=0

Happy hacking!

Setting up a GPIO-Button „keyboard“ on a Raspberry Pi

 
Update: If you need more than a hand full of buttons you might be better of using a matrix keyboard instead.

Back in late 2013, when I wrote the first Version of a raspberry-pi based software controlling a HD44780 based 4×20 characters LCD and 4 input buttons I started querying the buttons using the generic GPIO driver included in Raspbian and its sysfs interface.

However, this has a couple of drawbacks. First of all it is hardly portable to other Linux based hardware and one has to do a lot of stuff like debouncing on the application level.

Fast forward to early 2017. Raspbian now uses a device-tree based approach for system setup and a driver called gpio-keys is readily available in its standard kernel.

However, as it is often the case in the Free Software world, the documentation of this driver is limited to some README files included in the Linux kernel and some discussions scattered all around the web.

Linux already has drivers for almost all of the common low level peripheral interfaces like I2C, SPI, OneWire, hardware PWM and generic GPIO. It is usually the better approach to use them instead of constantly re-inventing the wheel.

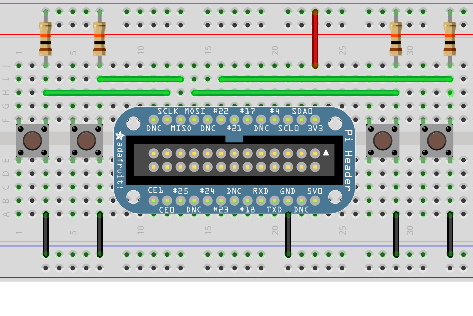
So here is my quick guide for setting up a „keyboard“ made up from a couple of buttons connected via GPIO ports as shown in the image.

gpio-keys

While this has currently only been tested on Raspberry Pi, it will likely also work on other Linux based boards with device tree enabled (e.g Beaglebone and others).

Keyboards in modern Linux Kernels are presented to userland as a so called input event device. To inspect them I would recommend the installation of the evtest and input-utils packages on Debian/Ubuntu based distributions. The lsinput command (run as root) shows which ones are available on a system.

So, what do we need to do to make a keyboard from our GPIO connected push-buttons?

The missing link between the gpio-keys driver and the setup of the actual GPIO ports, where the buttons are connected to, is a so called device-tree (DT) overlay.

While DT itself is a data structure for describing hardware, a DT overlay is something a user can put in place to change such a hardware description in a way which matches the actual application scenario (like buttons, buses etc. connected to the device).

So let’s build such an overlay for the four buttons shown in our schematic above.
The Documentation available at raspberrypi.org provides some clues about device tree overlays as well.

Here is the final result which works, so let’s go into the details:

    /dts-v1/;
    /plugin/;
    / {
       compatible = "brcm,bcm2835", "brcm,bcm2708", "brcm,bcm2709";
       
       fragment@0 {
          target-path = "/";
          __overlay__ {
             keypad: breadboard_keys {
                compatible = "gpio-keys";
                #address-cells = <1>;
                #size-cells = <0>;
		autorepeat;
                button@22 {
                   label = "breadboard Menu";
                   linux,code = <28>;
                   gpios = <&gpio 22 1>;
                };
                button@10 {
                   label = "breadboard down";
                   linux,code = <108>;
                   gpios = <&gpio 10 1>;
                };
                button@9 {
                   label = "breadboard up";
                   linux,code = <103>;
                   gpios = <&gpio 9 1>;
                };
                button@11 {
                   label = "breadboard enter";
                   linux,code = <14>;
                   gpios = <&gpio 11 1>;
                };
             };
          };
       };
    };

Our overlay fragment contains a keypad called breadboard_keys. This is actually the string which lsinput will show as the actual name of our input device. 22, 10, 9 and 11 are the GPIO port numbers corresponding to the green wires in our schematic.

The file gpio-keys.txt from the Linux Kernel source-tree will show us what our four button definitions need to look like. We need a label, which is arbitrary text, a linux,code which is actually a keycode as defined in /usr/include/linux/input-event-codes.h and we need a gpio definition with two options, the number of the GPIO to use and a boolean value indicating if the button is active low (1, as in our case) or active high (0).

Another thing I would like to point at is the autorepeat keyword. If given this will activate a key-press repeat behavior known from ordinary keyboards. The production of key-press-events will be repeated as long as the button is pressed.

Now how to enable this overlay on Raspberry Pi?
Very simple, once you know how 🙂

First put the above code in a file e.g. breadboard.dts.

Then compile a binary version and put it into the right place:
dtc -I dts -O dtb -o /boot/overlays/breadboard.dtbo breadboard.dts

Finally the following line must be added to /boot/config.txt:
dtoverlay=breadboard

Now we are done.

Here is how this looks like on the software side without any other input devices like keyboards connected:

root@raspberrypi:~# lsinput
/dev/input/event0
   bustype : BUS_HOST
   vendor  : 0x1
   product : 0x1
   version : 256
   name    : "breadboard_keys"
   phys    : "gpio-keys/input0"
   bits ev : EV_SYN EV_KEY EV_REP

root@raspberrypi:~# input-events 0
/dev/input/event0
   bustype : BUS_HOST
   vendor  : 0x1
   product : 0x1
   version : 256
   name    : "breadboard_keys"
   phys    : "gpio-keys/input0"
   bits ev : EV_SYN EV_KEY EV_REP

waiting for events
20:00:23.629190: EV_KEY KEY_BACKSPACE (0xe) pressed
20:00:23.629190: EV_SYN code=0 value=0
20:00:23.749163: EV_KEY KEY_BACKSPACE (0xe) released
20:00:23.749163: EV_SYN code=0 value=0
20:00:23.969176: EV_KEY KEY_DOWN (0x6c) pressed
20:00:23.969176: EV_SYN code=0 value=0
20:00:24.099151: EV_KEY KEY_DOWN (0x6c) released
20:00:24.099151: EV_SYN code=0 value=0
20:00:24.329158: EV_KEY KEY_UP (0x67) pressed
20:00:24.329158: EV_SYN code=0 value=0
20:00:24.439154: EV_KEY KEY_UP (0x67) released
20:00:24.439154: EV_SYN code=0 value=0
20:00:24.669157: EV_KEY KEY_ENTER (0x1c) pressed
20:00:24.669157: EV_SYN code=0 value=0
20:00:24.759176: EV_KEY KEY_ENTER (0x1c) released
20:00:24.759176: EV_SYN code=0 value=0
root@raspberrypi:~# grep breadboard /sys/kernel/debug/gpio
 gpio-9   (                    |breadboard up       ) in  hi    
 gpio-10  (                    |breadboard down     ) in  hi    
 gpio-11  (                    |breadboard enter    ) in  hi    
 gpio-22  (                    |breadboard Menu     ) in  hi    

Finally something which is not strictly on-topic concerning this post. There is something one should know about keyboard like input event devices like this. Pressing a button will send events to all applications normally consuming them (e.g. applications running on Linux console or X-Window system).

This might be an unwanted behavior. If so, your application software needs to issue a EVIOCGRAB ioctl after opening the input device.

icinga2 CheckCommand definition for calling a plugin with non-option arguments

Sometimes in my work as a Linux system adminstrator I come up with a solution which can not be found using Google, the all-knowing Trash Heap.

In this case I usually end up digging for the solution myself and sometimes I like to share them rather than documenting them only in house.

This way at least in future others will be able to google them 🙂

So here we go:

The most significant difference in icinga2 is the, arguably more clearly arranged, config file syntax.
Fortunately the actual tests from nagios/icinga1 can be used unmodified. However an appropriate CheckCommand definition is needed.

To create it for his custom tests or those tests which are not yet part of the official distribution an administrator need to create it from scratch or by means of copying and modifying another one.

In my case this has been proven to be quite easy with just one exeption. I have somne tests which require something that Unix slang usually calls non-options arguments.

What does this mean? Well a popular example of this kind of command would be git. Given the command git commit -a the term commit would be the non option argument.

So here is what a CheckCommand definition for this command would look like. Of course this does not make sense as an icinga test and can not be actually used.

object CheckCommand "git" {
	import "plugin-check-command"
	import "ipv4-or-ipv6"

	command = [ PluginContribDir + "/check_git" ]

	arguments = {
		# nonopt is the non option argument
		"nonopt" = {
			value = "$git_command$"
			skip_key = true
			order = 1
			required = true
		}
		"-a" = {
			value = "$git_all$"
			description = "commit all"
		}
	}
}

The perfect Gitolite-Server (with Kerberos Authentication and more)

Back in Juli I wrote a blog-post about how I set up a Gitolite-Server using Kerberos-Authentication.

As this post seems to be the only documentation on the web about how to do this, I got quite some feedback. In a recent email conversation I have been asked, if I know about a method, which would not require a patched Version of ssh.

Well, I did not know of one immediately, but now I have implemented one, which does not only make it unnecessary to patch sshd, but will also make the server a little bit more elegant to use from a users perspective 🙂

So here is a new Version of my Gitolite Server+Kerberos HOWTO

Login is now possible with your usual login name (username@servername), using gitolite@servername is obsolete and disabled by this setup.

Supported login-methods are:

  • password authentication (password is checked by whatever active Pluggable Authentication Module, pam_krb5 in my case)
  • authentication without password using an ssh public key
  • authentication without password using kerberos/gssapi

How to setup the system:

We once again start from a system which has a working Kerberos installation. We will however not need something like libnss-ldapd or libnss-sss. I assume that we are working as root, so just use sudo bash on Ubuntu and derivates.

  • Add a local user gitolite to your system with „*“ in passwd field
  • Download and compile libnss-catchall [1]:
  • git clone git://git.geggus.net/nss-catchall.git
    cd libnss-catchall
    dpkg-buildpackage or make

  • Install the resulting libnss-catchall package or shared library:
  • dpkg -i ../libnss-catchall*.deb

  • create /etc/passwd_nss_catchall as follows:
  • grep gitolite /etc/passwd >/etc/passwd_nss_catchall

  • Change the passwd line in /etc/nsswitch.conf as follows:
  • passwd: compat catchall

  • Append the following lines to your sshd_config [2]:
  • PermitUserEnvironment yes
    Match User !root,*
    ForceCommand /usr/local/bin/gitolite_wrapper_script

  • Create the gitolite_wrapper_script as follows:
  • echo -e '#!/bin/bash\n\n/usr/local/bin/gitolite-shell $LOGNAME\n' >/usr/local/bin/gitolite_wrapper_script

  • su to user gitolite and clone the gitoline code into this users home directory:
  • git clone git://github.com/sitaramc/gitolite.git gitolite.clone

  • Loosely follow the Installation instructions in README.txt which will boil down to the following commands [3]:

  • cd gitolite.clone
    mkdir -p $HOME/bin
    ./install -to $HOME/bin
    $HOME/bin/gitolite setup -a <adminid>

  • Make shure you have gitolite and gitolite-shell available in your PATH, I did this by adding symlinks to /usr/local/bin
  • That’s it! You should have a working gitolite server now

Public-key usage is a little bit different from the gitolite documentation. The lines in the file authorized_keys need to look like this:
environment="LOGNAME=your_username" ssh-rsa AAA

A command Option might be present, but is ignored because of the ForceCommand Option in sshd_config.

As with my old setup, Windows users will need to use plink.exe and point the environment variable GIT_SSH to this executable, openssh on Unix will work out of the box if gssapi authentication has been enabled.

[1] The whole stuff works because of libnss-catchall, a NSS (Name Service Switch) module written by me. It will always return a given single uid/gid/home combination for any user who managed to login somehow. This way we always end up being logged in as the gitolite user regardless of the username provided. The login username will however be present in the LOGNAME environment variable in case of gssapi or password authentication and must be set manually when using ssh public keys.
[2]If you have local users on your machine which should be able to use interactive logins adjust the „Match User“ line. On a multi-purpose machine one should IMO consider using the chroot feature of ssh and a separate IP-address for gitolite anyway.
[3]The string I call <adminid> here is most likely the login-name (local part of the kerberos realm) of the one installing this stuff (you!).

Google https-search in Firefox search bar

Google just announced the Availability of their Web Search via SSL.

Telling Google what you are looking for can’t be prevented that easy, but it is now possible to prevent telling anybody else who might sit in the middle of your communication.

Just use https://www.google.com instead of http://www.google.com for doing searches and you are done.

Well, unfortunately I don’t usually call the Website at http://www.google.com directly for doing searches but using the Firefox Search toolbar instead.

For some strange reason this toolbar can not be customized via GUI. However the solution is still simple and might be of value for anybody else, thats why I am about to write this 🙂

Just enter the directory where you firefox Installation is located and have a look for a file called google.xml inside a subdirectory called searchplugins.

All you need to do here is to replace any apperance of the string http:// by https://

Now restart firefox and enjoy your encrypted search.

Kategorien:

Von Wikipedia zu OSM Spezialkarten in 3 Mausklicks

Tim Alder hat die deutsche Geohack-Webseite nun so erweitert, dass wir im OSM Wiki ein template mit Verweisen auf OSM Spezialkarten pflegen können. Dadurch ist es nun zum Beispiel möglich mit 3 Mausklicks vom Wikipedia-Artikel eines Skigebietes auf die OpenPisteMap zu kommen! Ähnlich schön ist das natürlich bei der Reit- und Wanderkarte.

Bisher ging das nur sehr umständlich über die manuelle Eingabe von Geokoordinaten im URL.

Hier mal ein Beispiel:
Auf der Wikipedia-Seite von Zermatt öffnet man den Link „Koordinaten“. Von dort gelangt man über einen weiteren Link „Mehr Openstreetmap-Karten“ zur „Zermatt-Version“ des Templates. Wählt man hier nun die OpenPisteMap aus sieht man das Skigebiet von Zermatt.

Leider geht das bei der englischen Wikipedia noch nicht, weshalb ich den Artikel auch auf deutsch geschrieben habe.

Bookmarklet to load the current section of a slippy map into JOSM

In the meantime there are quite a lot of nice OSM based Slippy-Maps all around the Web. Usually they are based on Openlayers.

Now it happens from time to time, that I find something on one of this maps which needs to be corrected in the Openstreetmap database.

Unfortunately it is not very straight forward to load exactly the corresponding bounding box of the map into josm.

This has been solved in a very convenient way as far as the OSM Inpector is concerned. All you need to do there is to press the „load in josm“ button on the Website.

Wouldn’t it be nice to have this feature in any Slippy Map?

Well, here we go:

Based on Jochens code I have been able to code a Bookmarklet which does exactly this!

All you need to do is to add this URL to your Bookmarks.

Now, if you call the bookmark while browsing a Slippy-map an running josm with the remote plugin enabled, then josm is instructed to download all the OSM-data for the section displayed in the slippy-map.

Update: This is confirmed to work with IE6-8 and Firefox. This does not work with Opera, because they have a security code in place which is blocking access to localhost from within scripts (see discussion on Opera forum).

Effektiver Arbeiten auf der GNU bash

Wer mich kennt weiß, dass ich immer noch einen für manche vergleichsweise archaischen Desktop benutze. Streng nach dem alten Motto: Das X-Window System ist dafür da, dass man mehrere Konsolen nebeneinander benutzen kann.

Langer Rede kurzer Sinn, die aktuelle Version 4.0.x der Linux Standardshell hat nun zwei nette neue features, die ich natürlich gleich in meine .bashrc eingebaut habe.

Unterm Strich erspart man sich das häufige tippen der Kommandos cd und ssh.

Findet der Rechner einen unbekannten Befehl wird geschaut ob es ein Verzeichnis mit passendem Namen gibt, wenn ja wird in dieses Verzeichnis gewechselt. Wenn Nein wird nachgeschaut ob es einen passenden Rechnernamen gibt und wenn das der Fall ist erfolgt ein Remote Login über ssh auf diesem Rechner.

Das ganze sieht so aus:

# Auto-cd feature
shopt -s autocd

function command_not_found_handle() {
    host=$(echo $1 |sed -e 's/^.*@//g')
    # wenn hostname in .ssh/config, dann ssh dorthin
    if grep -q "Host $host" $HOME/.ssh/config; then
      ssh $*
    else
      if ! getent hosts $host >/dev/null; then
        echo "bash: $*: Kommando nicht gefunden."
      else
        ssh $*
      fi
    fi
}

Kategorien: